Are you a PS4 player and having a PS4 NAT-type failed issue? You’re in the right place. Gaming is fun; nothing can be more fun than playing games on the world’s biggest gaming Platform, PS4.

It provides gamers with a lot of advanced features and excellent games, but at times, the gamers face this NAT-type failed issue and white light issue.
Mostly, this issue takes place in the middle of the gaming which makes it more annoying. When the internet settings are incorrect and or there is an issue with the windows firewall or any security error, then this errors usually takes place.
So, how to solve it? Don’t fret, as I’m going to tell you about all the possible ways to solve this problem. Everything will be mentioned as clearly as possible using less technical words so you can comprehend everything better.
So, Are you ready to clear the confusion clear? Okay, without talking more, let’s head over to the topic.
What is NAT?
It’s crucial to know what NAT is so you can comprehend the issue in a good way. NAT(Network Address Translation). It translates the Public IP address to the Private IP address.
NAT also provides an extra layer of security since it hides the internal structure of an organization’s network from external users.
Data and systems that are mission-critical are protected from malicious actors. NAT is commonly used for home networks, as well as for larger public and private organizations.
Organizations can also use it to control what kind of internet traffic passes their firewall by blocking certain incoming requests or allowing specific types of internet traffic through their system based on organizational needs.
The NAT helps the user know the ease and the difficulty of connecting the PS4 systems, especially at the time you’re using the party chat.
PS4 has 3 types of NAT which are mentioned below.
1) Open NAT Type
In this NAT, the System contests directly to the system without having any firewall or router.
2)Moderate NAT Type
In this NAT type, the system is linked to the internet via a router or firewall. Usually, it doesn’t have any problems either.
3) Strict NAT
In this type, the system is connected to the internet via a router or firewall without open ports and DMC setup. Sadly, if you have this then you may have some problems related to the voice while communicating in the game.
Now that you have a basic knowledge about the NAT, it’s time to head over to the solution to the NAT type failure.
All the possible solutions will be mentioned in his article, so make sure you follow exactly what they’re mentioned. You don’t have to attempt all the methods mentioned in the article, though; try one and if it doesn’t work, then try another one. Keep doing it until your problem gets solved.
7 Ways to Solve “PS4 NAT Type Failed”
1) Configure the PS4 Network Settings Yourself
DMC(Demilitarized Zone) it’s an external company that offers professional services to plan and Implementations of the programs. It helps the users to correct the configurations settings of your router, and if all of the settings are set up correctly, it improves the network’s performance.
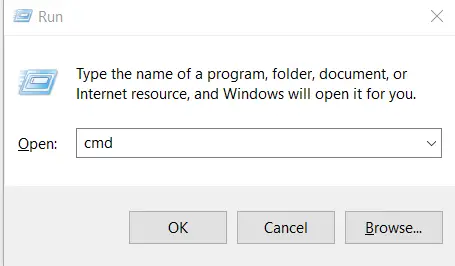
- Press the Windows key + R at once on the keyboard. Also, you can go to the window’s search bar and search for RUN, you’ll be directed to the RUN program. And type cmd and press enter to open command.
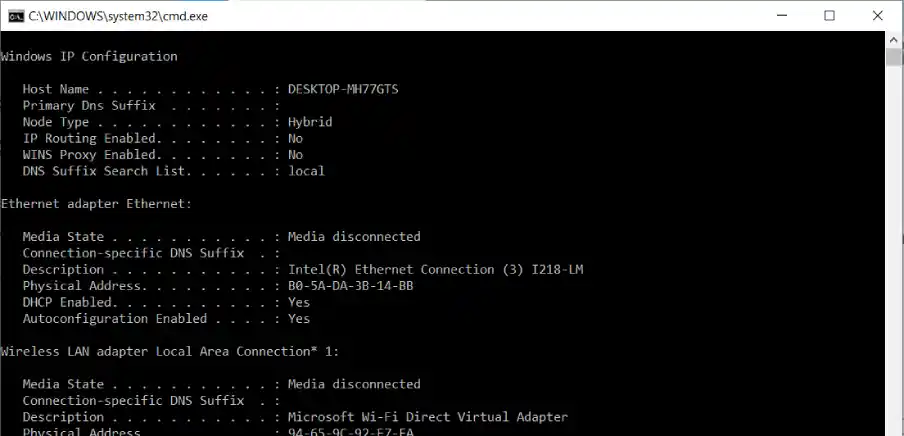
- ipconfig/all. Copy this command there and hit ok.


- 4) Write down somewhere the IP address, the defaulting door, the subnet cover, and the DNS server.
- 5) Head over to PS4 Settings > Network > Set Up Internet Connection.

- Then, click on the WiFi if you’re willing to connect to the wifi connection or if you are connecting to the Ethernet, then click on the Use a LAN Cable option,

- Choose custom and put the Information that you had noted.

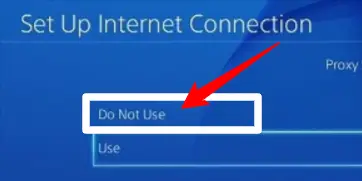
- Select Do Not Use This option for Proxy Server.

- Wait until the settings get updated; click on Test Internet Connection.
- And Boom, now the NAT type and the PS4 internet connection will have appeared on the screen. And, now you know both of these.

2) Forward Port for PS4
This is another technique to get your NAT-type failed issues resolved. It’s simpler than you think, so don’t worry and just follow the below-mentioned steps carefully.
- Firstly of all, head over to your browser on your computer and type 192.168.1.1 in the search bar, and hit the ‘Enter’ key.
- You’ll be directed to the Login page. Fill in the router’s details here and log in.
- Port Forwarding’. Now look for this option.
- Now, there will be a number of groups; you have to select one and hit the Add button.
- Presently, put the number of the port and IP address of the PS4 in the given table. Be that as it may, in the event that you don’t know about the Port Number, then, at that point, you can attempt 80(TCP), 3480(TCP), 443(TCP), 3479(TCP and UDP).
- Just click on Apply changes, and you’re done.
3) Make your PS4 the DMZ Server
DMC(Demilitarized Zone) it’s an external company that offers professional services to plan and Implementations of the programs.
It helps the users to correct the configurations settings of your router, and if all of the settings are set up properly, it improves the network’s performance.
- First of all, Take a brief trip and have a look at the IP address, Password, and Username on your wireless router.
- Open any browser either on your phone or whatever device you’re using, type the IP address, then hit enter.
- Put the username and the password and log in.
- head over to Advanced and then click on Forwarding; the DMZ will appear on the left. (Or then again, you can observe the DMZ segment in another tab as per the various routers.)
- And for enabling the DMZ, just click on the given Ënable option.
- Change the IP address to coordinate with the IP address in your PS4. You can likewise snap to open NAT sifting if you are utilizing routers that have the NAT Filtering choice, for example, the NETGEAR switch. (You can jump to the following stage on the off chance if you don’t have this option available.
- Hit Apply and click on the save option for saving the settings.
- Now, Turn off the router and then turn on it again, wait until it connects
- Head over to PS4 Settings, click on Network and Check the Internet Connection, and now see if the NAT Type is on (If the method worked properly, there should be mentioned two NAT types, Type 1 or Type 2.
Hopefully, this solves your problem.
4) Enable UPnP in your Router
UPNP represents Universal Plug and Play. A component empowers free correspondence between all gadgets in your organization in any case you previously got it, presenting a significant security risk.
When you enable the UPNP it will transform your home network into a crazy situation; thus, if a programmer needs to do terrible things to you, there will not be anything to keep him from doing what he needs
Also, when the UPNP is enabled in your router, it performs fast and smoothly.
Steps:
- Take a brief trip and Check the IP address, Password, and Username, and If your router is wireless, then(you will be able to see that on the bar of the router, search for the data on the manual way)
- Open any browser on your phone or laptop, then search for the IP address
- Put the username and the password to log in to your account.
- head over to Advanced and then click on Forwarding; you’ll see UPNP on the left. (Or then again, you can observe the UPNP segment in another tab as per the various routers.)
- And then, Startup your UPNP option.
- Modify the IP address to coordinate with the IP address in your PS4. (If you are not aware of what your PS4 IP address is,
- Assuming you are utilizing routers that have the NAT Filtering choice, for example, NETGEAR router, you can likewise snap to open NAT sifting. (You can jump to the following stage on the off chance if you don’t have this option available.
- Hit apply and click on the save options for saving the settings.
- Now, flick off your router and flick it on again, wait until it connects
- Head over to PS4 Settings, click on Network and Test Internet Connection, and now check if your NAT Type is on (There will be mention these, Type 1 or Type 2 if the method has worked properly).
And you’re done.
5) Use an Extra Ethernet Cable.
Connecting the PS4 with the Ethernet Cable is considered quite possibly the most solid technique for interfacing your PS4 console with the switch as the Ethernet Cable nullifies any sort of frail sign issues and gives the best association through the switch.
Without a doubt, in the remote connection, you can stay away from the migraine of wires connections getting in or out of the PS4 console.
Yet, it has security messes up moreover. In this manner, you really want to attempt another substitute method of an association like:
- Detach the PS4 console from your wireless router.
- Then, when you have an Ethernet cable, just connect the PS4 with your router
- connect your PS4 console with the router’s wireless organization, the Ethernet cable should be kept inserted throughout the process.
- Presently indeed, check whether you are as yet getting the PS4 NAT Type failed problem. I hope you won’t be encountering this problem again.
6) Talk to your Internet Service Provider About this Problem.
When none of the above-mentioned methods are working, there might have been made some changes to the router by the end of your Internet service provider. For that reason, you might be encountering this NAT type failed issue.
Ask the Service provider if has done any modification to the network, it has done then tell him about the issue you’re facing. He’ll tell you the solution.
7) Disable IPV6
at the point when your router is using the IPV6 network type for setting up a connection with the PS4 console from its servers, then it causes the PS4 NAT type failed error too. Changing switch settings. Works for you to take care of the issue.
- Open any browser on your phone or laptop, then search for the IP address
- Put the password and the username and login.
- On the off chance that you don’t have any idea how to find your IP address then, at that point, look at the above fixes in that I have noted the steps to get the IP address.
- Once you’ve assigned the IP address, Hit Enter option to get to the Router’s login page.
- Put the username and password just like above mention steps and log in.
- In the particular classifications on the router’s login page the two of which ought to be composed on the rear of your router. On the off chance that you can’t find these details, Just Enter “Admin” in both the username and secret key segment.
- Log in to your Router and look for the IPV6 setting. First of all, Disable IPV6 and enable IPV4.
Once you’ve done that, check the issues if it is resolved or not.
Point to Note
Hey there: As you’ve read this article completely, I hope now you know how to solve the Ps4 NAT type failed issue. Some of you might find it a bit hard, but trust me it isn’t. It’s easier than you think.
You just need to give it a try. And, make sure that you follow the methods carefully and don’t make any mistakes during the process, or else the method might not work and you’ll wonder why it’s not working.
Before you go to apply the methods, ensure that you’ve checked your router, the device you’re using it in, Ethernet cables, network connection, modem, and e.t.c.
If you need, you have the option of switching from one network connection to another or one device to another is available. You can do this too if you want.
I’ve tried hard to make this article as easy to read as possible because normally people don’t understand more technical words. If you have any confusion that you want to get cleared. Put it down in the comments box and I’ll be there to help you out.
Now I want to hear from you. How long have you been encountering this issue? Your comments will highly be appreciated.

Leave a Reply