Are you wondering how to remove the google smart lock on Facebook? You’re in the right place.
A lot of people are confused about this Lock not knowing that it’s designed to keep them safe and make it easier for them to log into their accounts without entering the password over and over.
But don’t worry, as I’m going to cover all the aspects of it in detail; ensure you read this post till the end, so you don’t miss something important.
Without any lecturing, let’s head over to the topic.
What is Google Smart lock on Facebook?
Google Smart Lock on Facebook is a security feature introduced by Google Inc. to help protect your Facebook account from hackers and malicious activity.
It enables you to set up two-factor authentication for your Facebook account, which helps to keep your data secure. Smart Lock can be activated through your Google Account settings and will provide an extra layer of protection for login attempts, along with added encryption of any third-party sites accessed from the browser.
This extra precaution gives users peace of mind when maintaining their online safety and privacy on social networks such as Facebook.

Google smart lock on Facebook is a solution to the biggest problem faced by users. Do you know what the problem is?
Let me tell you, some years from now, people used to have to put their username and password to log into their Facebook account whenever they wanted to use it.
Considering this problem, an excellent feature called Google smart lock was designed. It’s a Google app that was launched back in 2015 considering the user’s problem.
When this feature is enabled in your Facebook account, you won’t have to put your password and username over and over to log into your account; it would already be logged in. isn’t it useful?
Now the problem is that a number of folks have been asking the question frequently. How do you disable the google smart lock from your Facebook account? Therefore I’ve created this post for you.
Getting out of this lock is significantly easy; just follow the below-mentioned steps carefully as they’re mentioned.
How to disable the Google Smart Lock on Facebook?
Luckily, there are many methods to disable the google smart lock; I’m going to mention each so you can, at last, solve your problem by following the one. Follow each method just as it’s mentioned.
Method 1
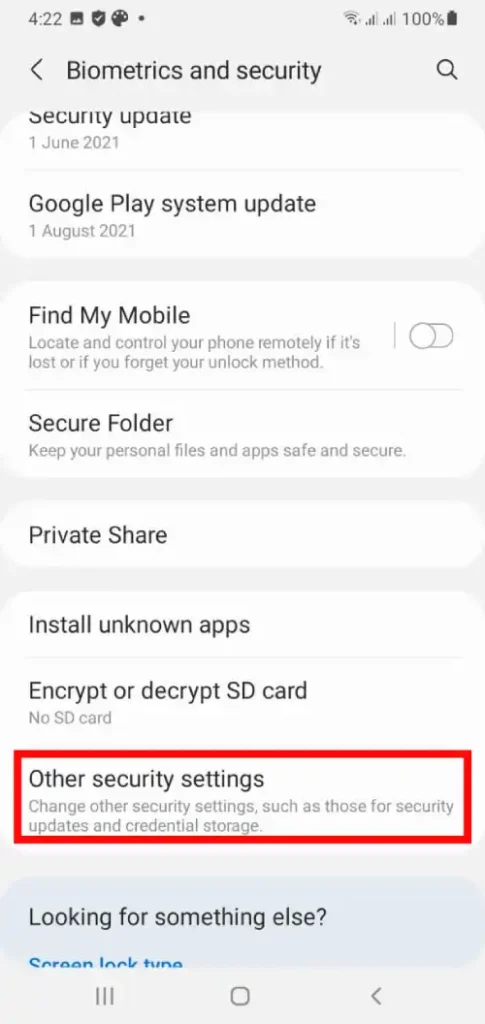
- Head over to the setting of the mobile.
- Search for biometrics and security. Once you find it, click on it.

- Once you done that, click on the security settings option.

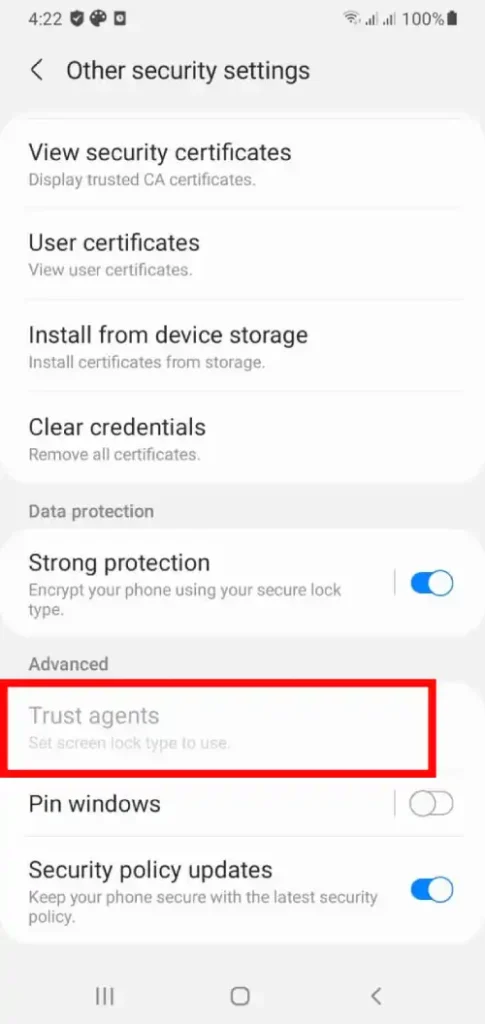
- Scroll down a little and hit the Trust Agent option.

- There will be an option called smart lock(google); it’ll be on, just off(disable) it off, and the smart lock will be disabled.
That’s how simple it is. Some people are also complaining about not getting the settings; if so, then just click on the search>Settings app, and you’ll get the settings from there.
Method 2
It’s another easy method to get your Google smart lock disabled.
- Head over to the Settings Facebook App.
- Scroll down and look for the Account section.
- There will some options appear just under Under the Account section,
- Tap on the Smart Lock for a password.
- Choose the Facebook app from the never save option.
Hopefully, after applying this method, your issue will get resolved. if still it doesn’t get fixed, read on the other methods that may work for you.
Method 3
- Head over to the settings of the Facebook app and open it.
- Go down and search for the google from the account tab settings.
- There will be able an option named Manage Google your account; click on it.
- And then, hit on the option of the Security tab near the policy tab.
- Go down a bit and click on the password manager option. When you click this option, you’ll be directed to the page password manager, from where all of the apps will appear. Just select the Facebook app.
- Once you selected the Facebook app, click on the delete option
And you’re done. Hopefully, one of these third methods will surely help you to disable the google smart lock on Facebook. Apply one method and if it doesn’t work then consider applying the second one. Keep doing it until your work is done.
Now, not every one of you is using Facebook on an app PC; some of you must be using an Android. So, what about you guys? How would you disable the smart google lock on your Facebook being an android user?
No worries, as I’m going to tell you some of the ways for android device issue too that will help you. Follow the below-mentioned steps carefully.
How to Disable the Google Smart Lock on Facebook on your Android device?
1st Method
- Flip over to mobile setting on your android device.
- Search for the Biometrics or security option from there; if the name is written a bit differently, then it’s okay; it depends on the device your using.
- After that, go down and look for the trusted agent option. Once you got it, there will be an option to turn it off, so do that, and you’re done. The smart lock of the google should not have been disabled.
Try this method out; this method will indeed work for you. In case if it doesn’t, then there is another method that will definitely do the trick.
2nd Method
- Go into the settings of your Facebook app.
- There will be a search icon on the corner. Tap on it.
- Search for the Trusted agent option; once you find it, click turn it off, and the smart goggle lock will be disabled.
Final Note
As you’ve read this article till here, I hope now you know everything about Google smart lock on Facebook also you know how to disable it on your Facebook. It’s not as difficult as it seems, just follow the above-mentioned steps carefully and you’ll do it easily.
Some people get mixed up just by finding differently written options on their devices, hear me up, the options might be written differently on your device, it’s not a problem. Just follow the ways exactly as mentioned.
I tried to explain it as clearly and easily as possible so you can comprehend everything without any trouble. But, still, if you get any problems, I’m always here for you, just put your query in the comment section and I’ll reply to you as soon as possible.

Leave a Reply